
Returns & Documents – how to issue a customer or supplier return document
TL;DR
Open a returns document from the Returns tab, choose Customer return or Supplier return and the other party, scan the items changing hands on your phone, capture a signature on screen and click Create return document. If an ERP is connected, pick which document to create in it. Opening a document and scanning need the orders-management permission; every document line costs one credit.
Who this is for and when
The Returns & documents module covers the moment goods move in reverse: a customer brings items back to the counter, or you send damaged or surplus stock back to a supplier. Instead of a note in a pad, every return closes as a document with scanned lines, a signature and a timestamp.
The Returns tab is shown to company managers, sub-managers and workers. Opening a document, scanning lines, editing and deleting need the orders-management permission (see Before you start).
Before you start
- The Returns & documents module is part of your license. If it is locked, clicking the tab opens the Unlock Returns & documents dialog marked Requires ERP integration. See License & Purchases.
- The company has a credit balance. Every document line costs one credit the moment it is added. A company at zero credits cannot open a document.
- Whoever opens a document or scans into it is a company manager, co-manager, sub-manager, or a worker with Full order management access (manager-level for orders only) from Users. A worker without it sees the list and opens documents read-only.
- The returned items exist in the item catalog.
- The customer exists under Customer Management, or you create them from inside the document. The supplier exists under Supplier Management.
Two document kinds
| Customer return | Supplier return | |
|---|---|---|
| The other party | A customer from the directory, or a new customer entered on the spot | A supplier from the directory |
| When | A customer returns goods at the counter or on site | Damaged or surplus goods go back to the supplier |
| Signature title | Customer signature | Supplier signature |
| Document number | Starts with return_ | Starts with supplierReturn_ |
Both kinds follow exactly the same path and appear in the same list, with a Type badge telling them apart.
Step by step
Opening a document
- Open Management ← Returns.
- Optional: pick a branch in the branch selector. It is pre-filled in the next dialog.
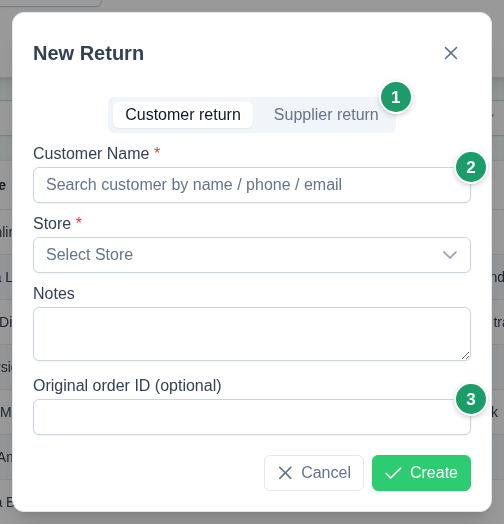
- Click New Return. The New Return dialog opens.
- Choose the kind: Customer return or Supplier return.
- Choose the other party:
- For a customer return: type in Customer Name by name, phone or email and pick from the list. For a customer who is not in the directory, click + Add new customer, fill in Customer name and optionally Phone, Email, Tax ID and External code (ERP), then confirm. The customer is saved to the directory.
- For a supplier return: type in Supplier Name and pick from the list. For a supplier who is not in the directory, click Add new supplier, fill in Supplier name and optionally VAT ID (optional) and External code (ERP), then click Create Supplier. The supplier is saved to the directory.
- Pick a Branch if the company has more than one.
- Optional: write Notes, and enter Original order ID (optional) to link the return to the order the goods came from.
- Click Create. The document is created with the status Open and the counter page opens right away.
Scanning the returned items
- The title on the phone reads Creating a new return - [branch] (or Creating a new supplier return - [branch]).
- Optional: click Show Return details to see the other party, the notes and the lines added so far.
- Scan or type every item changing hands. Optional: enter a quantity if Show Quantity Window After Scan is on.
- Scanning the same item again adds to the existing line – and is not charged again.
- Click Create return document (for a supplier return: Create supplier return document). The button is enabled only once there is at least one line.
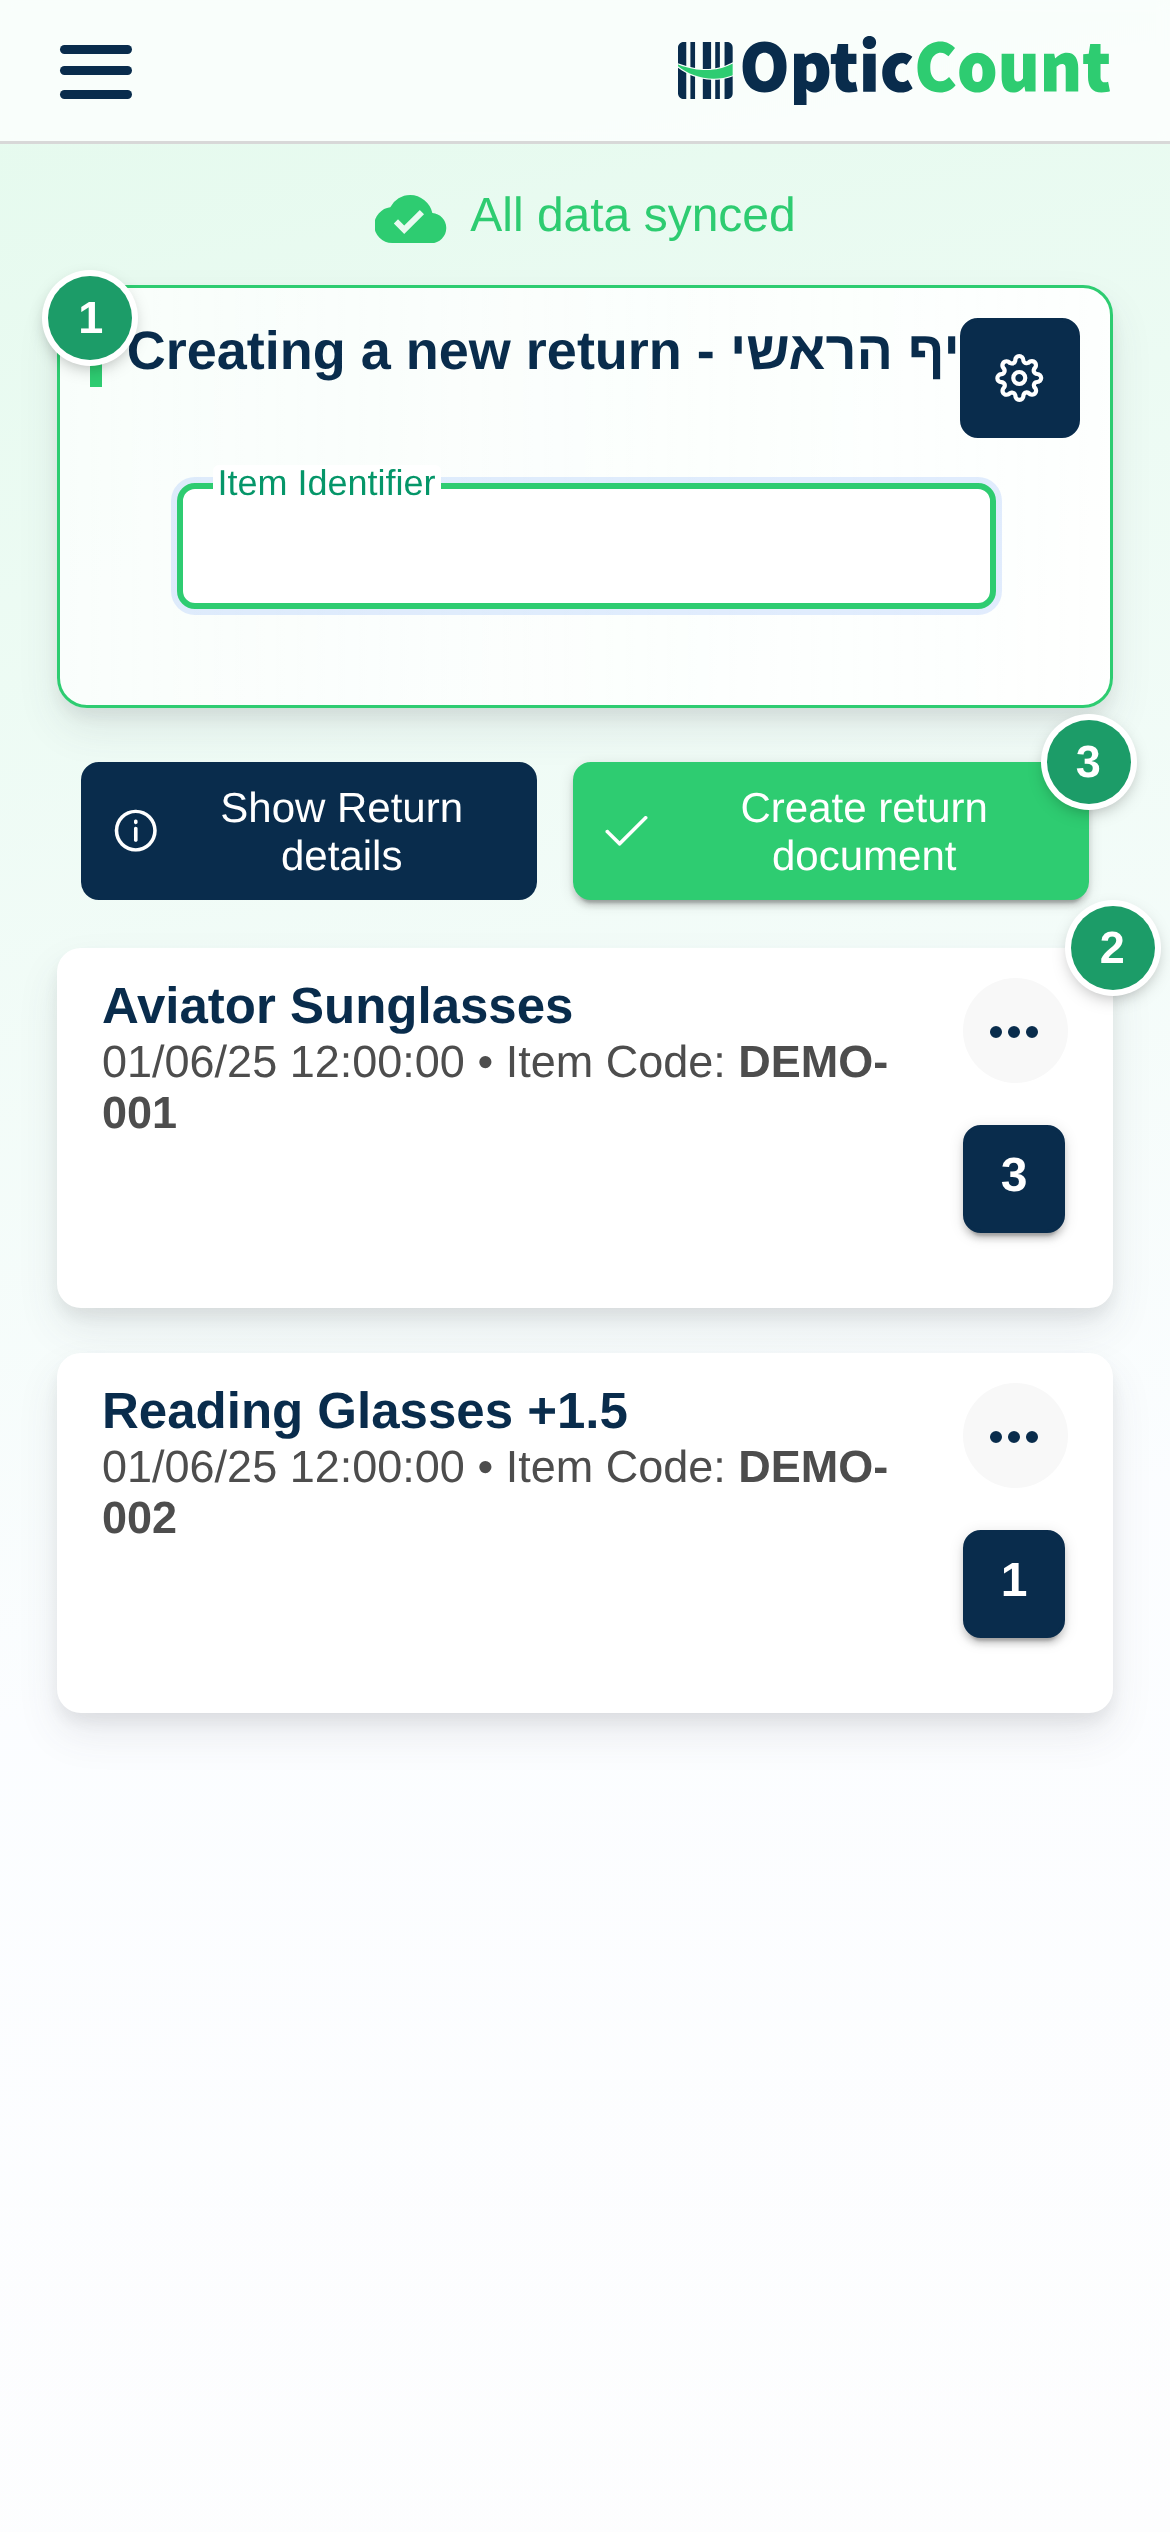
Left halfway? The document stays in the list with the status Open and the lines you already scanned. Click the document number in the list to keep scanning.
Choosing an ERP document
- If the company has an active integration that can create return documents, the Which document should we create? dialog opens with the options the integration offers, for example Create return note or Create supplier return, and always Just finish.
- With more than one integration, Where should this be reported? opens first.
- Without a suitable integration the dialog does not appear and the document closes locally.
Signing on screen
- The Customer signature (or Supplier signature) dialog opens with the prompt Please sign in the box below.
- Ask the customer or the supplier's representative to sign with a finger. Clear erases it so they can start again.
- Click Confirm. The signature is stored on the document with the signing time. Skip closes the document unsigned – the signature never blocks.
What happens next
- The status changes to Confirmed. The scanned quantity on each line is recorded as the returned quantity. The page returns to the Returns tab.
- ERP. When you chose an ERP document, OpticCount posts the return to the ERP before closing it. If the ERP rejects it, the document stays Open and the message The document was not created in the integration appears with the reason.
- Branch stock does not change in OpticCount. The returns document records what changed hands; the stock movement is created in the ERP you sent the document to.
- Credits. Every new line on the document costs one credit when it is added – by scan or by hand. Changing a quantity, signing and confirming are free. See License & Purchases.
- Statuses in the list:
| Status | Meaning |
|---|---|
| Open | The document is open; lines can be added and removed |
| Confirmed | The document is closed. A manager can reopen it on the counter page and fix lines |
| Cancelled | Appears in the status filter only – there is no cancel action on screen. Delete a document you do not need |
Managing the list
- Filtering: the branch selector, Status (Open, Confirmed, Cancelled), Type (Customer return, Supplier return), and search by Order Number or Customer Name. Filters are remembered between visits.
- Opening: clicking the document number opens it on the counter page.
- Editing: the Edit button opens Edit return document – change the other party, branch, notes and original order, see the signature if one was captured, or click Open in counter. The kind cannot be changed.
- Deleting: the delete button on the row asks for confirmation in Delete return document; click Delete.
Irreversible action
Deleting a returns document removes the document and all of its lines. There is no restore, and the credits paid for the lines are not refunded.
Common problems
- No "New Return" button → you lack Full order management access. Ask a company manager for it.
- "Create return document" is disabled → the document has no lines. Scan at least one item.
- "Order draft not found or already confirmed" on the counter page → the document was deleted. Go back to the list.
- The customer does not come up in the search → click + Add new customer inside the dialog. No need to leave for Customer Management.
- "The document was not created in the integration" → read the reason, fix it in the ERP (for example a missing customer code) and click Create return document again. The lines and the signature are kept.
- "Verify before retrying" → the ERP did not acknowledge the previous attempt. Check whether the document already exists in the ERP, and only then click Yes, send again.
- You scanned an extra item → open Show Return details on the counter page and remove the line before creating the document.
Related pages
- Returns screen – look up the list columns and the edit dialog
- Customer Management – maintain the customer directory
- Supplier Management – maintain the supplier directory
- Orders – find the original order number
- Counter page – learn the document creation mode