
Goods Receiving – how to receive a supplier delivery into stock
TL;DR
Upload a delivery note or invoice (photo or PDF); OpticCount extracts the lines and matches them to your catalog, you review and confirm, and the quantities land in branch stock. No document? Create a manual receipt and scan the items on your phone. For managers and sub-managers; every receipt line costs one credit.
Who this is for and when
Goods Receiving is for anyone who takes deliveries from suppliers and wants branch stock updated without typing dozens of lines by hand. The Goods Receiving tab is shown to company managers and sub-managers only. Regular workers do not see it in the menu.
You use the module in two situations:
- A delivery arrives with a document – photograph or upload it and let the engine build the receipt.
- A delivery arrives without a usable document – open a manual receipt and scan the items off the pallet.
Before you start
- The Goods Receiving module is part of your license. If it is locked, clicking the tab opens the Unlock Goods Receiving dialog marked Requires ERP integration – the module needs a supported integration. See License & Purchases.
- The company has a credit balance. Every new receipt line costs one credit the moment it is created – including lines in a draft that is never confirmed. A company at zero credits cannot open a receipt or upload a document.
- The incoming items exist in the item catalog. A line that is not linked to a catalog item blocks confirmation.
- Optional: the supplier is set up under Supplier Management. If your integration creates supplier delivery notes in the ERP, the supplier must have an external code.
- Supported files: PDF, JPG, PNG, WebP and HEIC, up to 20MB each (the on-screen hint reads PDF, JPG, PNG, WebP, HEIC · up to 20MB each).
Two paths
| Path | When | How lines are added | Initial result |
|---|---|---|---|
| Receive from Document | You have a delivery note or invoice | The engine extracts the lines from the document | A draft for review |
| New Receipt (manual) | No document, or you count off the pallet | You scan items on the counter page in receiving mode | A draft |
On both paths stock changes only when you click Confirm Receipt.
Step by step – receiving from a document
Uploading the document
- Open Management ← Goods Receiving.
- Click Receive from Document. The Receive Goods from Document dialog opens.
- Drag the file onto Drop files here, or click Choose Files. On a phone, tap Scan Document and photograph the delivery note.
- Optional: add more files. Several files in one upload are merged into a single document – for example three photos of a three-page delivery note.
- Click Start Processing. The document appears as a card on the tab with a progress bar.
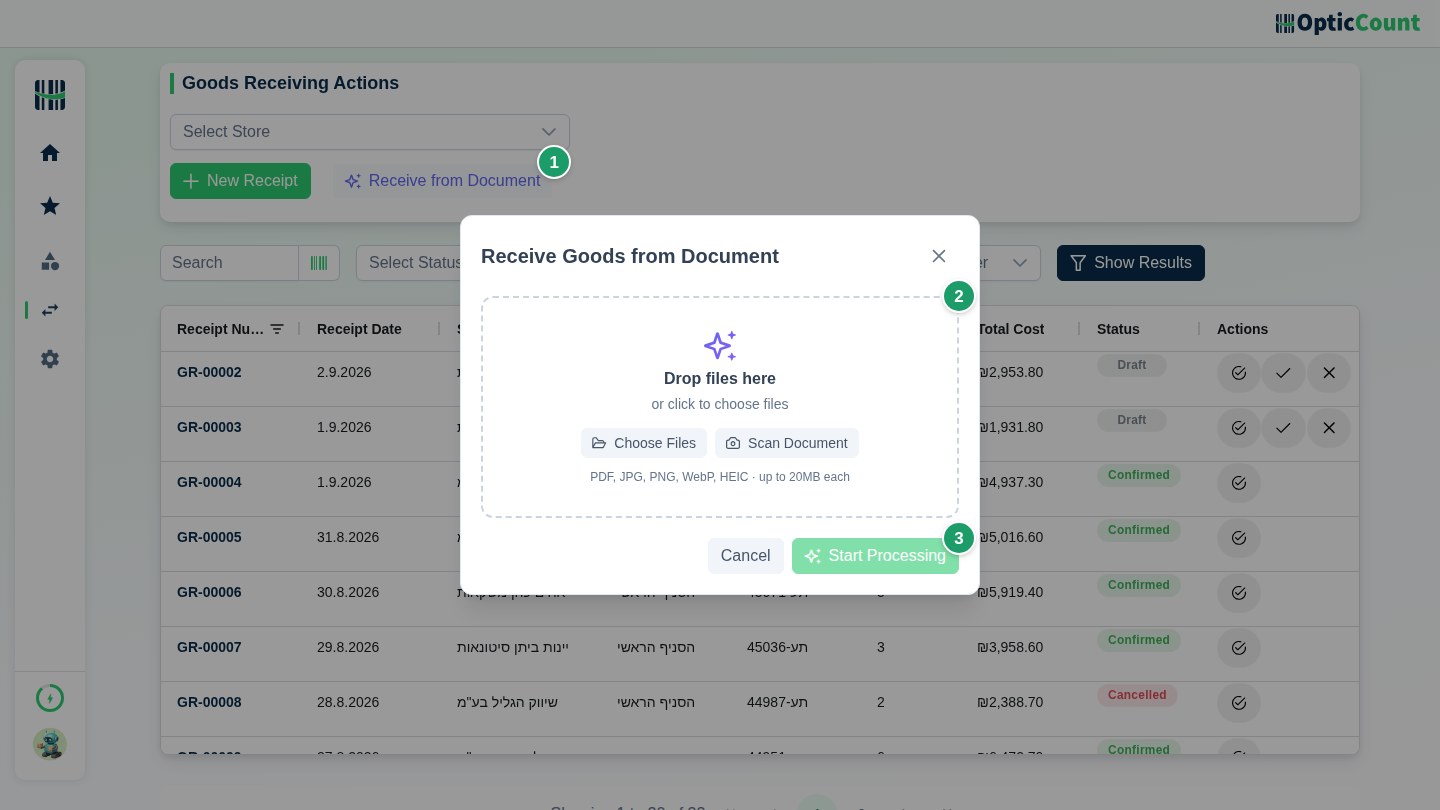 A file that was already processed successfully is not processed again – the app takes you to the existing result. Only a failed file can be uploaded again.
Following the processing
The card shows the current processing stage. You do not need to stay on the page – the cards are kept in the browser and keep updating when you come back.
| Stage on screen | What happens |
|---|---|
| Queued | The file is waiting in line |
| Identifying document type | The engine classifies it: Delivery note, Tax invoice or Other |
| AI extracting document data | Supplier details, document number, date, totals and lines are read |
| Matching to catalog | Each line is matched to a catalog item; X of Y items matched is shown |
| Ready for review | Click Review & Confirm to open the review screen |
| Failed | Click Retry – the same file is processed again without re-uploading |
If you exceed the daily document-analysis quota, the message Daily AI limit reached appears. Continue with manual receipts and upload again the next day.
The review screen
The Review Document Receipt screen opens as a dialog from the tab, and can also be opened as a full page at /goods-receiving/ai-review/[job number]. The original document is shown next to the form.
- Check Receipt Details: Supplier Name, Branch / Warehouse, Delivery Note / Invoice Number, Receipt Date, Allocation Number and Notes. The fields are pre-filled from the document and can be edited.
- Pick a supplier. If nothing matches, No matching supplier found for this name. appears – click Add new supplier, enter Supplier name and External code (ERP), then click Create Supplier.
- Pick a Branch / Warehouse. Without a branch the Confirm Receipt button stays disabled.
- Go through Detected Items. Each row shows the description from the document, the Catalog Item, Qty, UOM, Unit Price and Line Total. The Method column explains how the match was found.
- Fix rows flagged Worth checking or No match found: click the row, choose an item in the Select Catalog Item dialog, or click Create new catalog item.
- Optional: click Add item for a line the engine missed, or Delete line for a row you do not want (shipping, discount).
- Check the Review notes: Total mismatch appears when the sum of the lines differs from the Document Total; an Allocation Number warning appears on a tax invoice with no allocation number. Neither warning blocks you.
- Click Confirm Receipt. The receipt is saved as a Draft and returns to the list. Stock has not changed yet.
Match levels in the "Catalog Assignment" column
| Label | How the item was found |
|---|---|
| Certain match | Identical barcode in the catalog (95% confidence or higher) |
| Good match | Identical item code (85%–95% confidence) |
| Worth checking | Description similarity only (60%–85% confidence) – check before confirming |
| No match found | Confidence below 60%, or the engine found no item; pick one manually |
| Manual assignment | You picked the item on the review screen |
The Method column shows where the match came from (barcode, item code, description similarity, or manual choice).
Confirming from the list
- Find the receipt in the list. Its status is Draft.
- Optional: click Reopen for Review to go back to the review screen. The button appears only on receipts created from a document.
- Optional: click Verify Receipt and count the items on your phone (see Verifying on the phone).
- Click Confirm Receipt. The message Receipt N confirmed and stock updated appears.
Step by step – manual receipt
- Open Management ← Goods Receiving.
- Optional: pick a branch in the branch selector. It is pre-filled in the next dialog.
- Click New Receipt. The New Goods Receipt dialog opens.
- Enter a Supplier Name (required) and pick a Branch / Warehouse. Optional: Delivery Note / Invoice Number, Receipt Date, Allocation Number, Notes.
- Click Continue to Items. A draft is created and the counter page opens in Goods Receiving mode. The title reads Receiving from [supplier].
- Scan or type each item that arrived. Scanning the same item again adds to the quantity on the existing line.
- Click Finish Receiving. The receipt is confirmed and the message Receipt N created successfully appears.
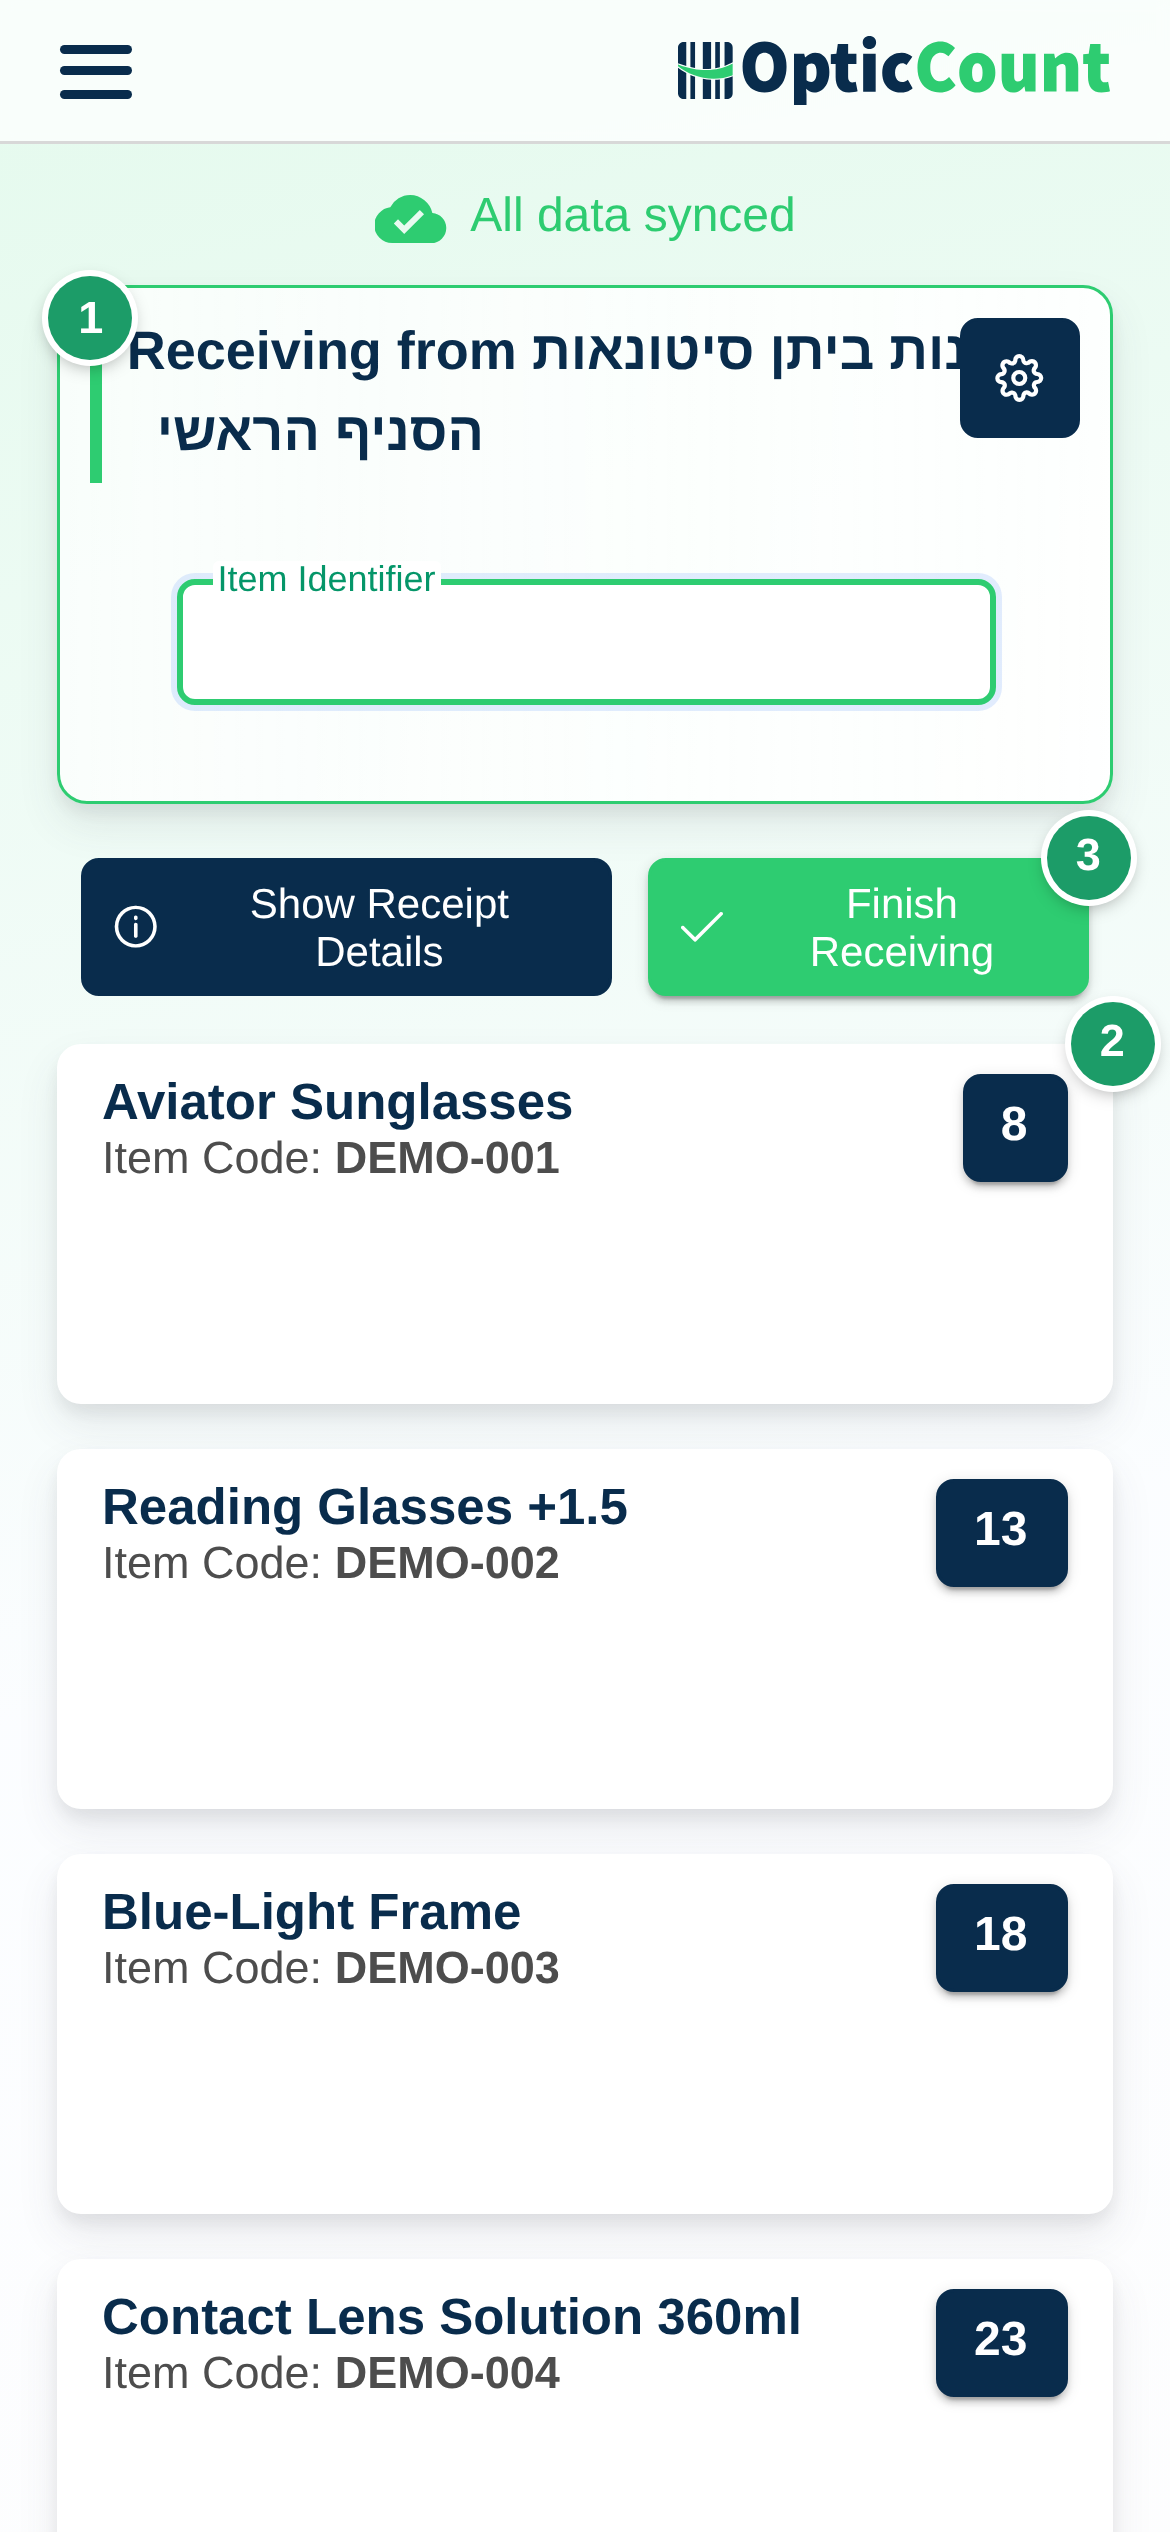
If you leave the counter page before Finish Receiving, the draft stays in the list with the status Draft. Click Confirm Receipt on its row to complete it, or Cancel Receipt to void it.
Verifying on the phone
The Verify Receipt button (the ✓-in-a-circle icon) opens the counter page in Receipt verification mode – you physically count what arrived against the lines on the receipt.
- Scan each item. The received quantity on the line is updated.
- An item that is not on the receipt shows Item X was not found in this receipt.
- An item that is already complete shows Item X is already fully verified.
- When every line is verified, All items verified successfully! appears and the page goes back to management.
On confirmation, the verified quantity goes into stock; a line that was not verified goes in at the quantity on the document.
What happens next
- Branch stock goes up. A positive count record is created for each line, in the receiving branch, under the confirming user, inside the active counting cycle. The records appear in Inventory Counts and in reports.
- ERP. If the active integration creates supplier delivery notes, OpticCount posts the receipt to the ERP before confirming. If the ERP rejects it, the receipt stays a Draft and the message Failed to create the supplier delivery note in the ERP appears. A supplier without an external code shows Link a supplier with an external code to this receipt before confirming.
- Credits. Every new receipt line costs one credit when it is created – in a draft from a document, in a manual draft, and when scanning in receiving mode. Editing quantities, confirming and cancelling are free. See License & Purchases.
- Statuses in the list:
| Status | Meaning | Editable? | Affects stock? |
|---|---|---|---|
| Draft | A manual receipt, or a document receipt after Confirm Receipt on the review screen | Yes | No |
| Confirmed | The receipt is closed and stock was updated | No | Yes |
| Cancelled | The receipt was voided | No | No |
Irreversible action
Confirming a receipt updates stock and cannot be undone. Fix a mistake with a manual count on the counter page.
Common problems
- The tab is missing → you are a regular worker, or the module was not purchased. Ask a company manager for access, or unlock the module under License & Purchases.
- Confirm Receipt is disabled on the review screen → Branch / Warehouse is empty, or rows carry the Some lines need review label. Link every row to an item or delete it.
- "Document is too large for a single pass" → split the file into smaller parts and upload each part separately.
- "AI provider rate limit reached" → wait a minute or two and click Retry.
- "Could not process document" → photograph it again in good light without cropping, or switch to a manual receipt.
- The engine matched the wrong item → click the row and pick the right item in the Select Catalog Item dialog before confirming.
- "Receipt draft not found or already confirmed" on the counter page → the receipt was already confirmed or cancelled. Go back to the list.
- The total mismatch does not go away → check quantity and unit price on the flagged rows, and Subtotal (pre-VAT) against the document. The mismatch does not block confirmation.
Related pages
- Goods Receiving screen – look up every field and column
- Supplier Management – set up suppliers and their ERP external code
- Item catalog – create items before receiving
- Counter page – learn the receiving and verification modes
- License & Purchases – track credit usage