
Returns screen
The Returns screen lists every returns document in the company – customer returns and supplier returns – and is where you open a new document, pick up an open one on the phone, edit its details and delete it.
Who sees it: Primary User · Co-Manager · Sub-Manager · Employee (view only)
Used in modules: returns
How to get here
- On the phone: ☰ menu → Management → Movements → Returns
- On a computer: side menu → Movements → Returns
Paid module
Returns & documents is a paid module that requires an ERP connection. If the module has not been purchased, the menu item is shown locked. Details on the License & purchases page.
What is on the screen
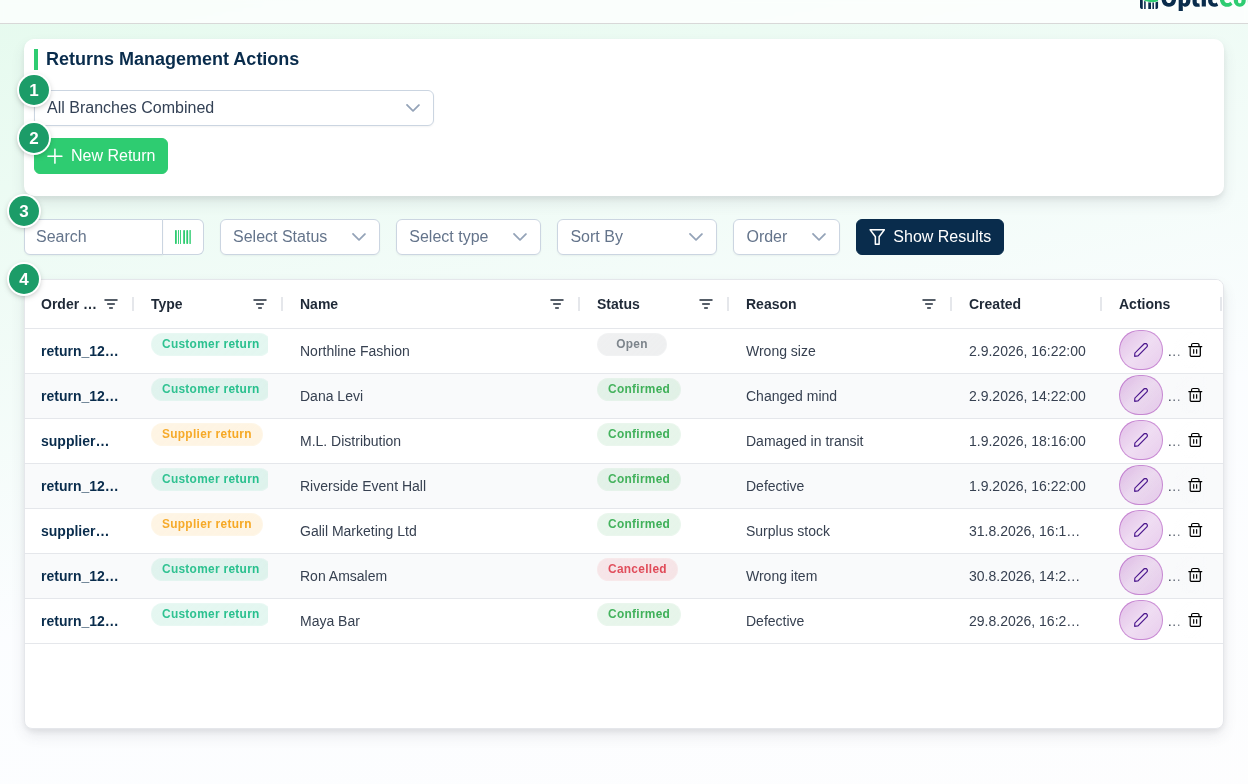
(1) Branch picker
Shown when there is more than one branch. All Stores lists every document; picking a branch filters the table and is pre-selected on a new document.
(2) New Return
Opens the document creation dialog. Shown only to users with order management access (see Permissions).
(3) Search and filters
Search by Order Number or Customer Name; filter by status and by type (All types / Customer return / Supplier return); sort by Created At, Order Number, Customer Name or Status. Filters are remembered between visits.
(4) Documents table
Clicking a document number opens it on the counting page so you can keep scanning items.
Table columns
| Column | Content |
|---|---|
| Order Number | The returns document number. |
| Type | Customer return (green) or Supplier return (amber). |
| Name | The customer or the supplier, depending on the document type. |
| Status | See Statuses. |
| Reason | The document-level return reason, or — when there is none. The create and edit dialogs have no reason field, so the column is usually empty. |
| Created | Creation date and time. |
| Actions | Edit and Delete – only for users with management access. |
Document types
| Type | Counterparty | When to use |
|---|---|---|
| Customer return | a customer from the Customers list | a customer brings goods back to the store |
| Supplier return | a supplier from the Suppliers list | sending damaged or surplus goods back to a supplier |
Statuses
| Status | Meaning |
|---|---|
| Open | The document was opened and its item list is still being built on the counting page. |
| Confirmed | The document was finalized and closed. If an ERP document was chosen, it is created at this point. |
| Cancelled | The document was cancelled. |
Every status change is recorded in the document's history with the user and the time.
Actions
New Return
- Click New Return.
- Pick the type: Customer return or Supplier return.
- Choose the Customer Name or Supplier Name (required). The search matches name, phone or email. A customer who is not on file is added on the spot with + Add new customer.
- Choose the Store (required when there is more than one branch).
- Optional: fill in Notes and Original order ID (optional) – the number of the order the goods belong to.
- Click Create. The document is created as Open and the counting page opens immediately to scan the returned items.
- Scan the items and click Create return document (for a supplier return: Create supplier return document). If there is more than one reporting target, choose Which document should we create? (for example Create return note or Just finish). A Customer signature or Supplier signature dialog opens – sign on screen and click Confirm, or Skip. The document moves to Confirmed.
The rest of the flow on the counting page is described in Returns & documents.
Picking up an open document on the phone
An Open document that was closed halfway is not lost. Click its number in the table, or open Edit and click Open in counter – the counting page opens with the items already scanned.
Editing a document
Edit opens Edit return document. The type is locked; you can change the customer or supplier, the store, Notes and Original order ID. On a signed document the Signature is shown too. Click Save.
Deleting a document
Delete asks for confirmation (Delete return document) and removes the document permanently.
The signature on the document
The signature is stored on the document itself together with the signing time, and is shown in the edit dialog. It is optional – Skip closes the document without one, and a signature cannot be added after closing.
Permissions
| Role | What they can do |
|---|---|
| Primary User, Co-Manager, Sub Manager | Open, scan, edit and delete documents in every branch. |
| Employee with Full order management access (manager-level for orders only) | Same as a manager. |
| Employee without that permission | Sees the list only. New Return, Edit and Delete are not shown. |
The permission is set on the Users page.
Dangerous actions
Deleting a document cannot be undone
Delete removes the document, its lines and the signature. A document already created in the ERP is not deleted there. There is no recovery.
Related pages
- Returns & documents – scan returned items and close a document on the phone
- Customers – manage the customers that appear on returns
- Suppliers – manage suppliers for supplier returns
- Orders – find the original order number
- Integrations – connect the ERP that receives return documents