
Order picking – how to pick an order from the phone
TL;DR
Orders land in Orders from Wix, from Bina or by manual creation. The manager assigns them to pickers, by hand or with auto-assign. The picker taps Start Collection, scans the items against the order on the counter page and taps Finish Collection. The order moves to Collection Completed, a Wix order is marked fulfilled, and every order line costs one credit.
Who this is for and when
This module is for a business that receives customer orders and collects them in a warehouse or store. The manager brings orders in and assigns them; the picker, usually an employee, picks from the phone. Order picking is a paid module and requires a supported ERP integration.
Before you start
- The module is purchased. Otherwise Orders shows a lock in the sidebar, and tapping it opens the Unlock Order picking dialog with a View plans & unlock button.
- An active integration in Integrations with Wix eCommerce or Bina. Without one, the locked dialog shows Requires ERP integration. See Integrations.
- Pickers exist in Users and are assigned to the branch they pick from.
- Credits in the bank. Start Collection is blocked when the bank is empty.
- Optional: customers in Customer Management, so you can choose an existing customer on a manual order. See Customers.
Step by step
Step 1: Bring orders in
There are three ways, and you can combine them:
| Source | What you do | What happens |
|---|---|---|
| Wix eCommerce | In Orders click Click here next to For manual sync. | New and updated orders come in with the number WIX-…. Last sync at shows the last run. A scheduled sync also runs on its own once the integration is set up. |
| Bina | Click Click to perform initial sync with Bina, and later Click here for a manual sync. | A Bina sync completed summary shows how many orders were received, imported, updated and skipped. An order with no matching branch is not imported. |
| Manual | Click New Order, fill in customer, priority, due date and notes, then add items by search or by scanning. | With an active Bina integration the order is also sent to Bina after saving. |
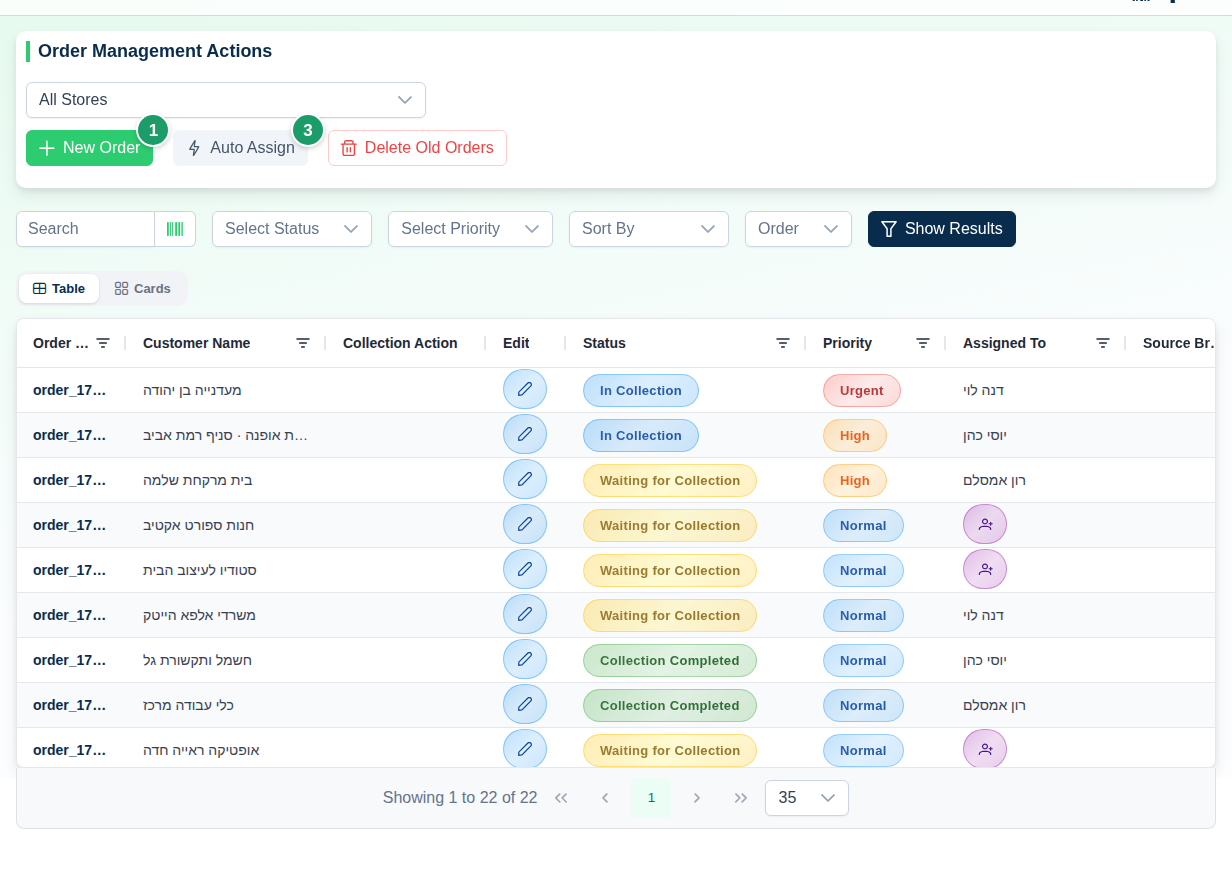
Step 2: Statuses and priorities
Every order carries a status and a priority. Filter by them with Show Search and Sort Options.
| Status | When |
|---|---|
| Waiting for Collection | A new order, imported or manual, that nobody has started to pick |
| In Collection | A picker tapped Start Collection |
| Collection Completed | The picker tapped Finish Collection and confirmed |
| Shipped | Filter value only; the app does not move an order to this status by itself |
| Cancelled | Filter value only; the app does not move an order to this status by itself |
A manual order is saved as a Draft from the moment you click New Order and fill in the details, until you add items on the counter page and confirm. Drafts show in the table when you filter by the Draft status.
| Priority | Use |
|---|---|
| Low | Not urgent |
| Normal | The default for a new order |
| High | Before normal orders |
| Urgent | Handle immediately |
Step 3: Assign to pickers
- Manual assignment: click Assign Collector in the order row and choose a worker. The column shows Assigned to: with their name, or Not assigned.
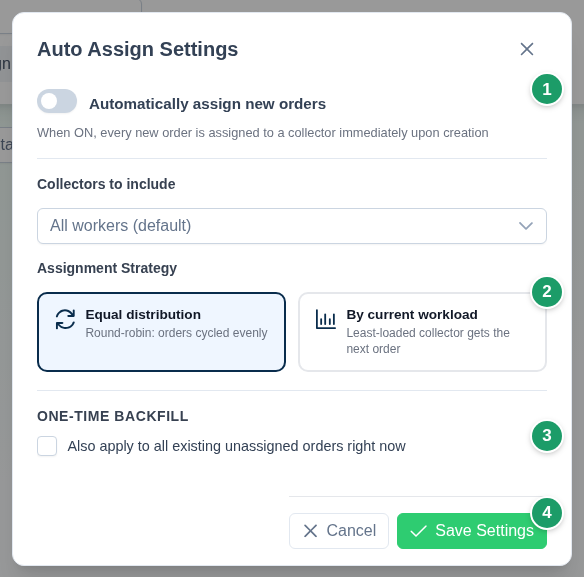
- Auto-assign: click Auto Assign. In the Auto Assign Settings dialog:
| Setting | What it does |
|---|---|
| Automatically assign new orders | Every new order, imported or manual, is assigned immediately |
| Collectors to include | Who takes part in the rotation. Empty = All collectors (default) |
| Assignment Strategy | Equal distribution hands orders out in turn (round-robin); By current workload gives the next order to the picker with the fewest open orders |
| Also apply to all existing unassigned orders right now | A one-time backfill of orders already waiting |
| Also reassign already-assigned orders | Includes orders that already have a picker in the backfill |
Click Preview Backfill to see who would get what without saving, Save Settings to store only the rules, or Save & Apply to store them and run the backfill now. When it finishes you see N orders assigned.
Step 4: Who sees which orders
| User | What they see in Orders |
|---|---|
| Company manager / sub-manager | All orders, summaries, import, assignment and editing |
| Employee with Full order management access (manager-level for orders only) | Same as a manager, but only for their branches, and without the other management pages |
| Employee (picker) | Only the orders assigned to them |
The permission is switched on in the user's card in Users.
Step 5: Pick on the phone
- In Orders tap Start Collection in the order row. The counter page opens in collection mode with the title Collection in Store: [branch name] and the list of order items. An order already started shows Continue Collection instead.
- Scan each item. The collected quantity on the card goes up and the message N units of item collected successfully appears. Items with the same identifier are merged into one row with a combined quantity.
- To collect a quantity other than 1 per scan, turn on Show Quantity Window After Scan in settings; the app switches it on by itself when you try to edit a quantity. A quantity above the requested one asks for confirmation: Entered quantity exceeds requested quantity. Continue?
- If you scan an item that is not on the order, the Item Not in Order dialog opens. Tap Use this item as replacement and choose which order item it replaces; the card is marked (replacing: [item name]). Yes, Cancel Replacement undoes it.
- An item that is already fully collected shows Item has already been fully collected and is not collected again. Delete Item from Order removes a line from this order.
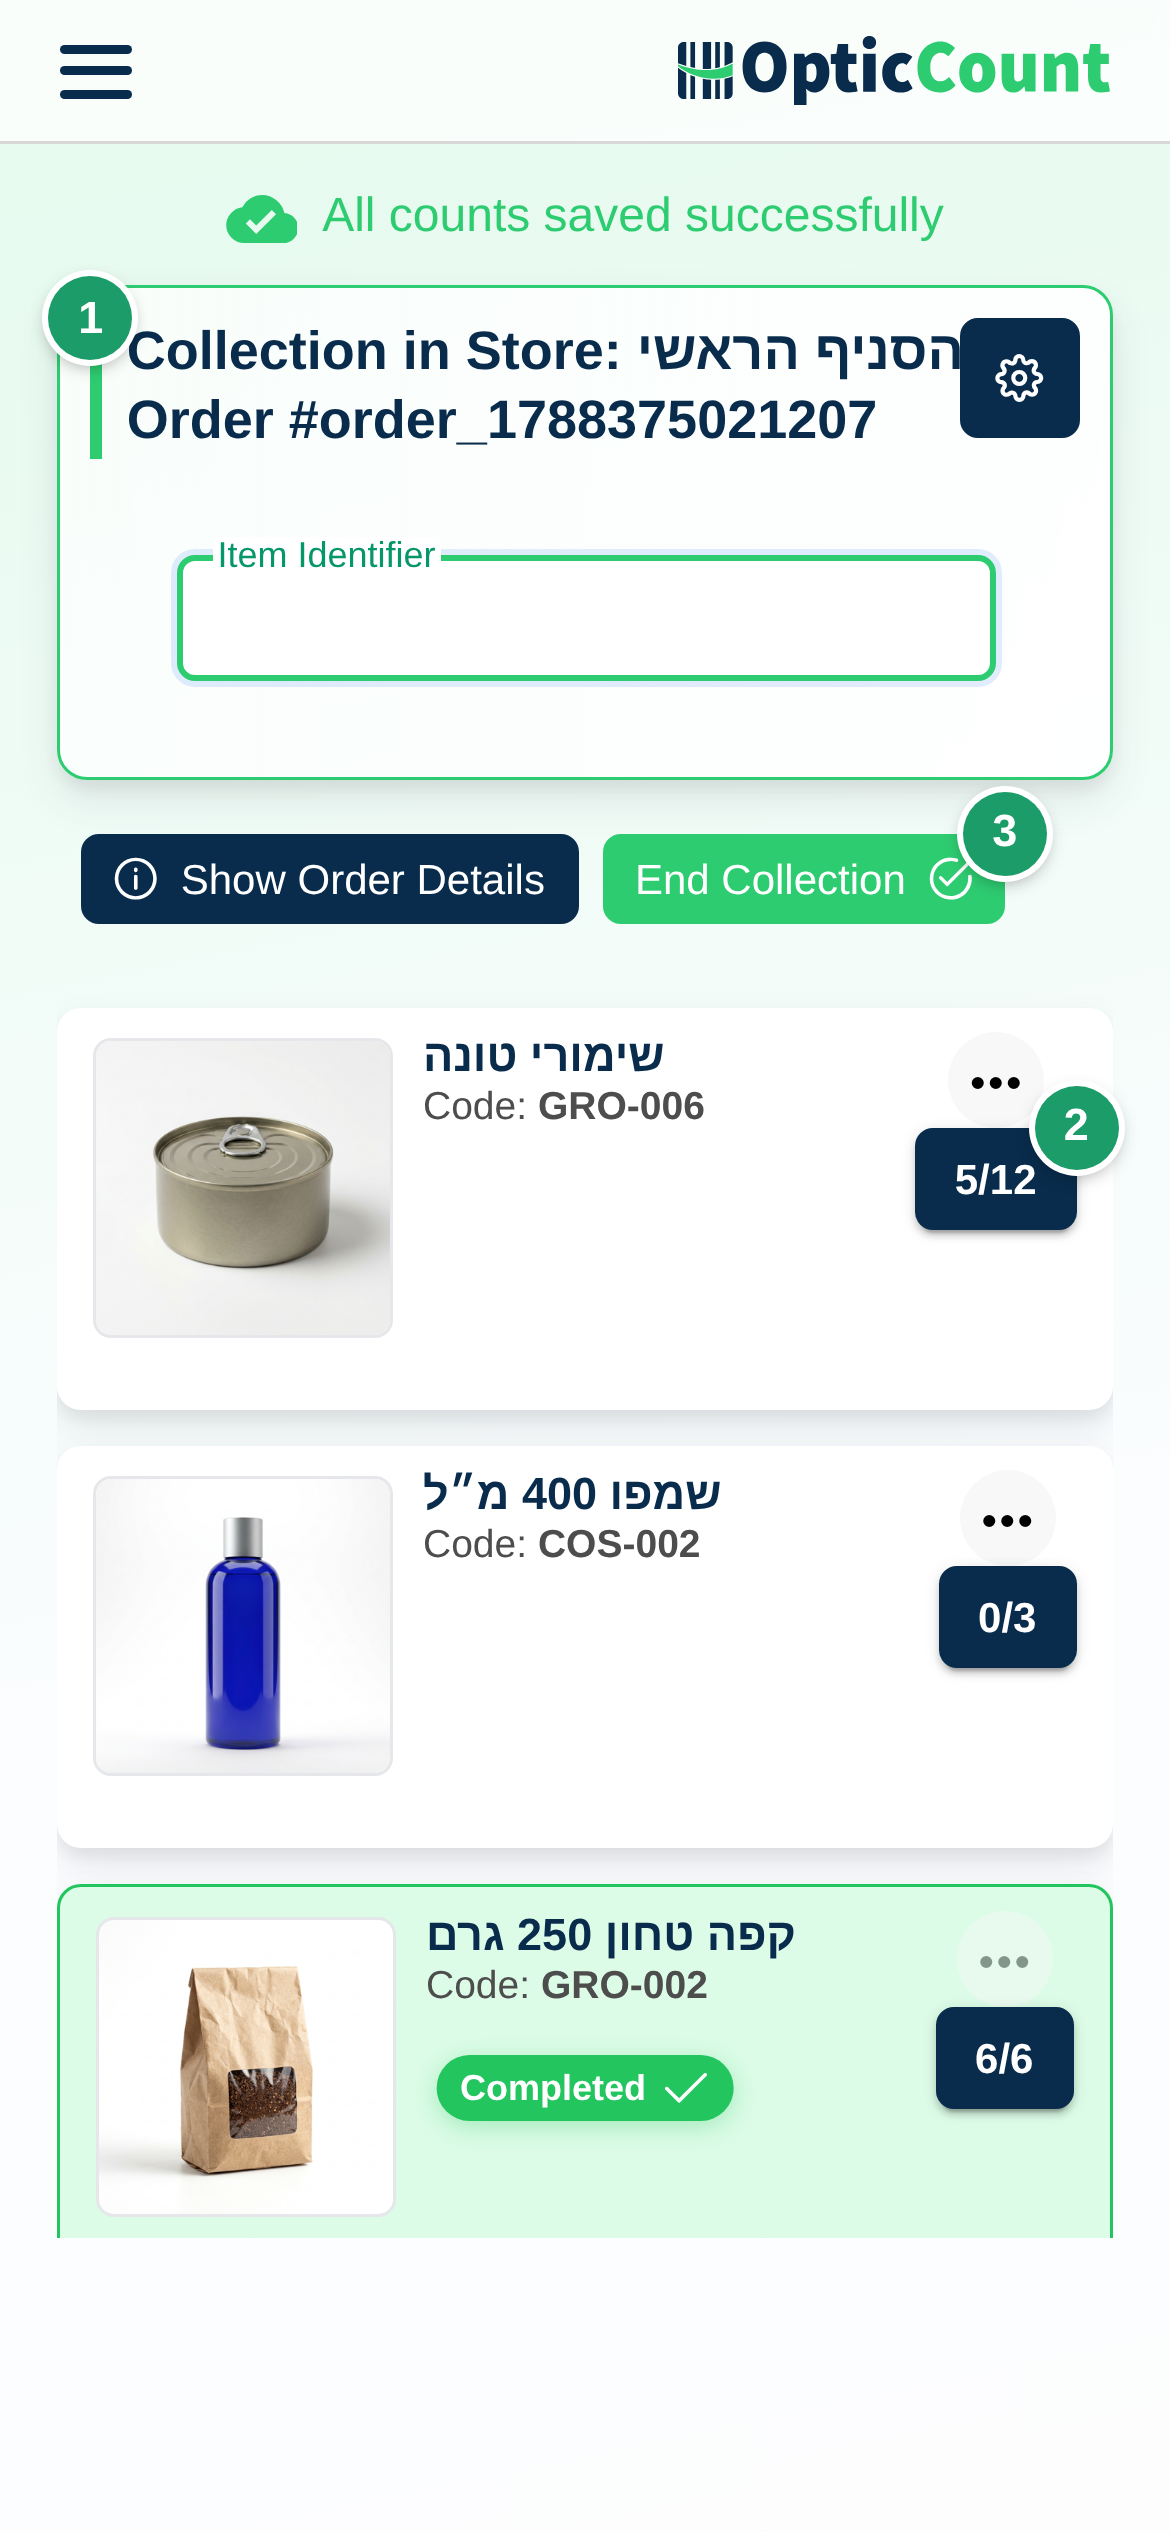 Scan notes are not available in collection mode. Every field and button of the mode is described on the Counter page.
Step 6: Finish the pick
- Tap Finish Collection. The message depends on the state: All items in the order have been collected, Some items have not been fully collected yet or No items have been collected yet. Confirm.
- If the integration can create a document, choose in Where should this be reported? (only when more than one integration applies) and then in Which document should we create?: for example Create delivery note, Create tax invoice or Just finish (close the order without a document). Without a suitable integration the order closes straight away.
- Review the Collection Summary dialog: Fully Collected, Partially Collected, Not Collected. Closing it returns you to Orders.
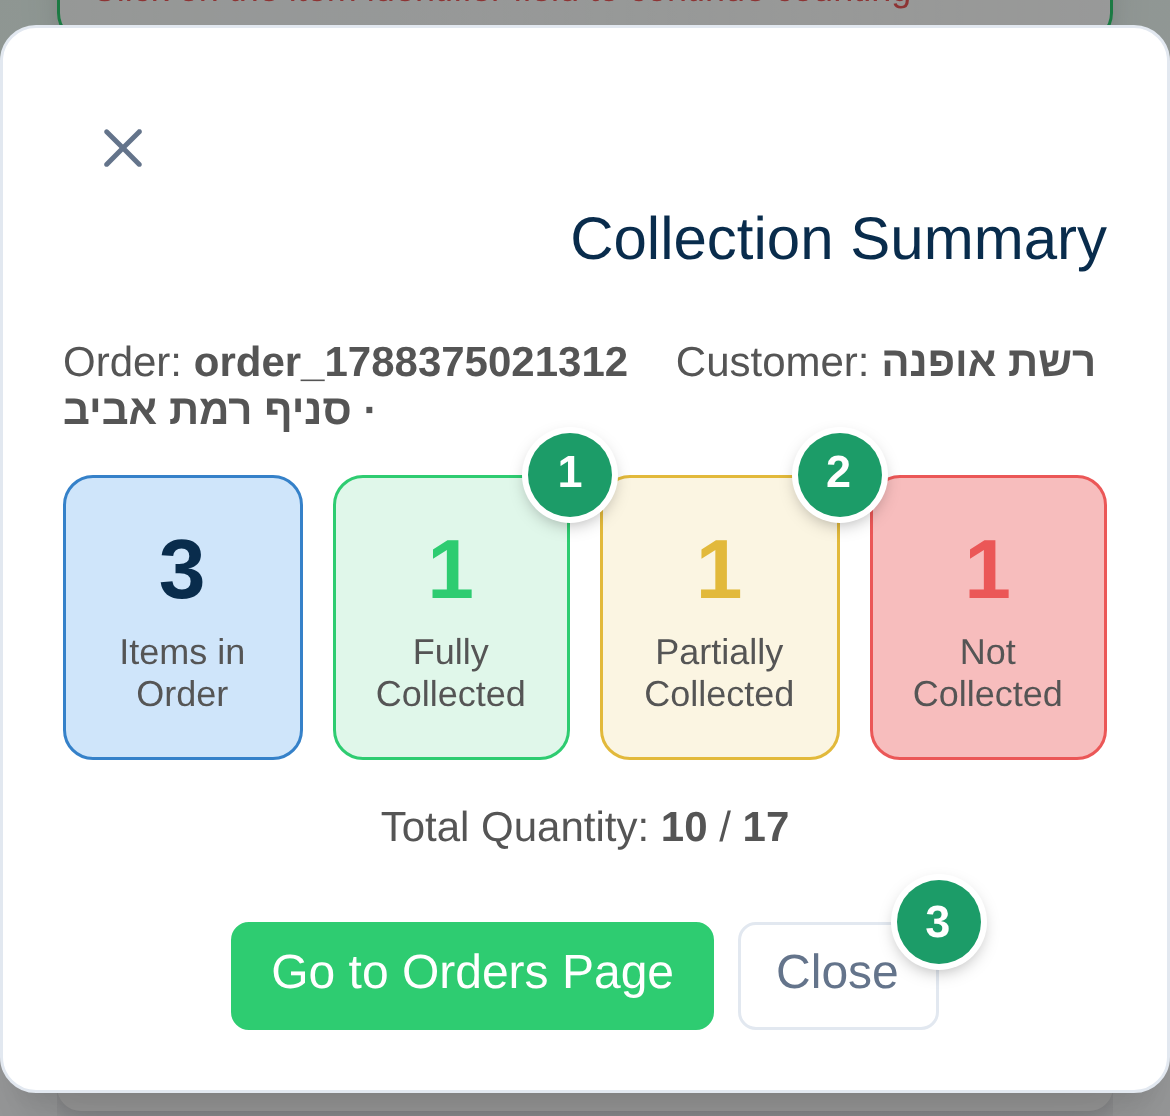
A partial pick is still a finish: the order moves to Collection Completed either way, and the summary records what is missing.
What happens next
- The order shows the status Collection Completed, and the row button becomes View Collection. View Order shows requested against Collected Quantity for every item, plus the status history.
- A Wix order (number
WIX-…) is marked fulfilled in Wix automatically. If that fails, the order in OpticCount is still completed; see "Common problems". - If you chose a document in Which document should we create?, the document is created in the ERP. If the ERP did not confirm, the order stays open until you try again.
- Billing: every order line that was picked costs one credit, whether it was scanned, collected with a tap or entered by hand. Scanning the same line again is not charged twice.
- Export to Excel in the order row downloads the order details. Delete Old Orders deletes orders before a chosen date, with no undo.
Common problems
- If Orders is locked in the sidebar → the module was not purchased or there is no integration. Tap View plans & unlock, and connect an ERP in Integrations.
- If you see Company does not have orders permission. Please contact administrator → the company is calling a module that is not on its license. The company manager buys it in License & Purchases.
- If Start Collection returns All purchased scans have been used → the credit bank is empty. Top up credits; a pick that already started continues.
- If the sync returns No new orders found in Wix → nothing new since the last sync. Check the payment-status filter in the Wix integration settings.
- If you see Wix eCommerce integration not found or inactive → enable the integration in Integrations and test the connection.
- If the Bina summary shows orders were not imported - no matching store found → the branch name in Bina does not match the name in Branches. Compare the names listed under Unrecognized branch names and fix them.
- If finishing shows We couldn't update the integration. The order was not finished → the ERP rejected the document. Fix the cause and tap Finish Collection again.
- If you see The integration didn't confirm the update. The document may have been created → open the ERP and check whether the document exists. Only then confirm Yes, send again in the Verify before retrying dialog, so you do not create a duplicate document.
- If a worker cannot see an order → it was not assigned to them. Assign it with Assign Collector or turn on Automatically assign new orders.
Related pages
- Orders – every field, filter and action on the screen
- Counter page – collection mode on the scanning page
- Users – set up pickers and the order-management permission
- Integrations – connect Wix or Bina
- Returns & documents – a returns document linked to an order